DIY Fairy Garden Terrarium

IMG_1496 (1)

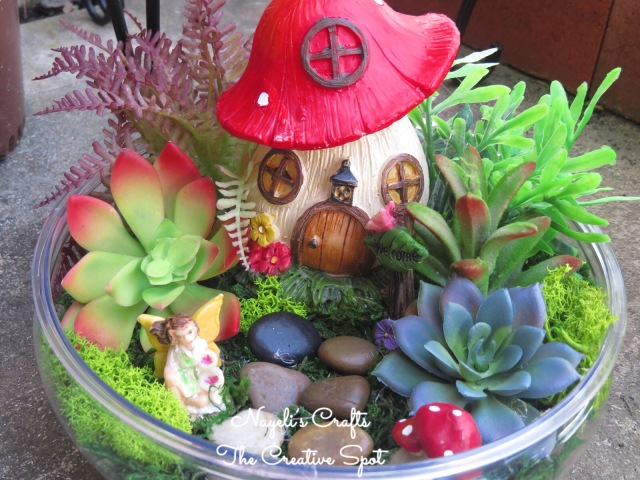
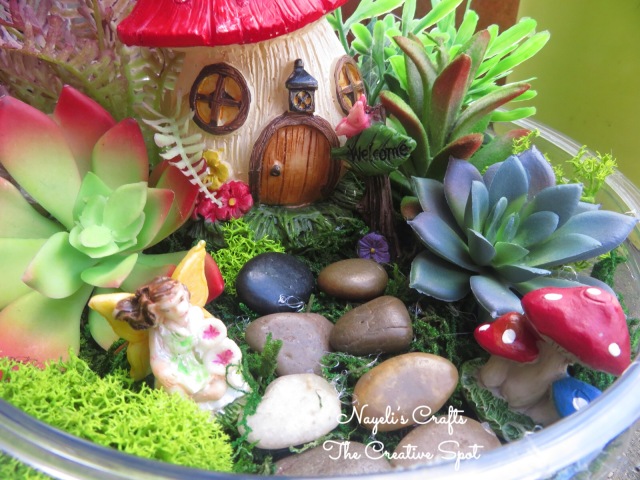
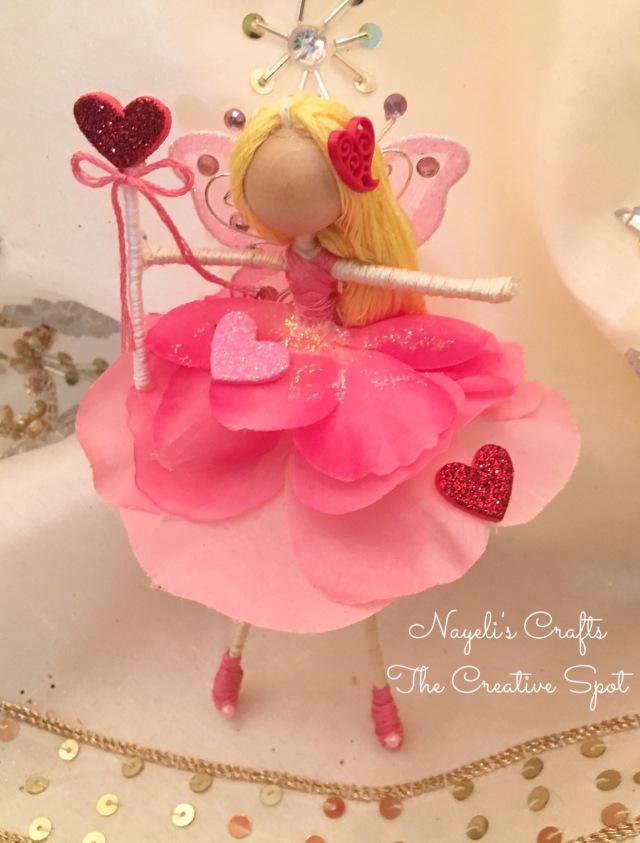
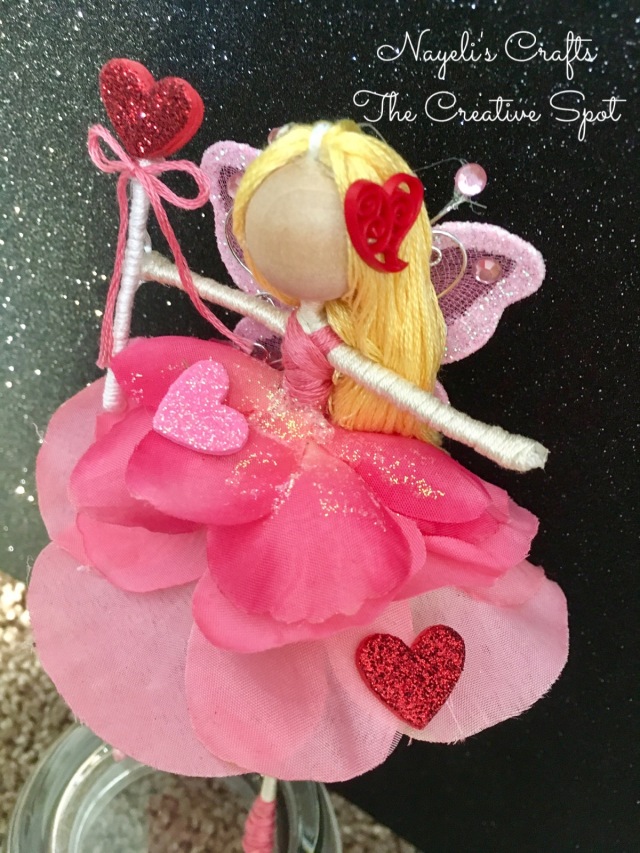
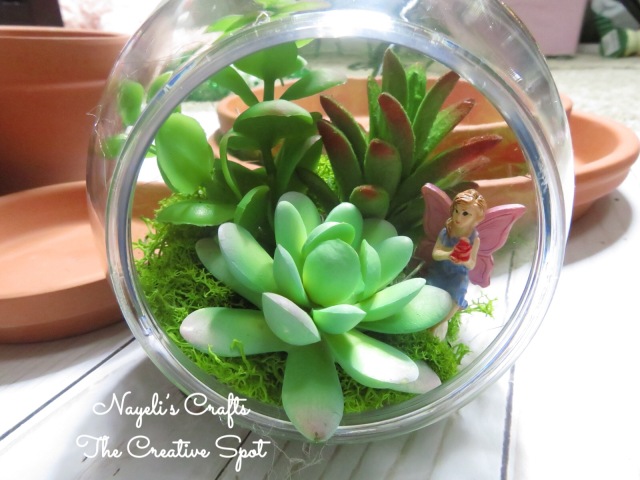
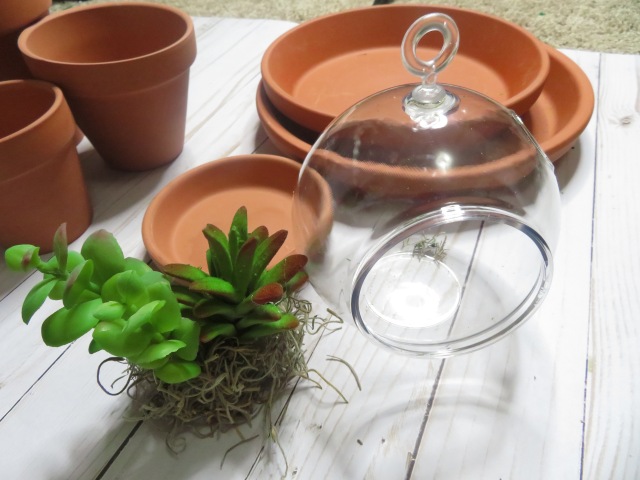
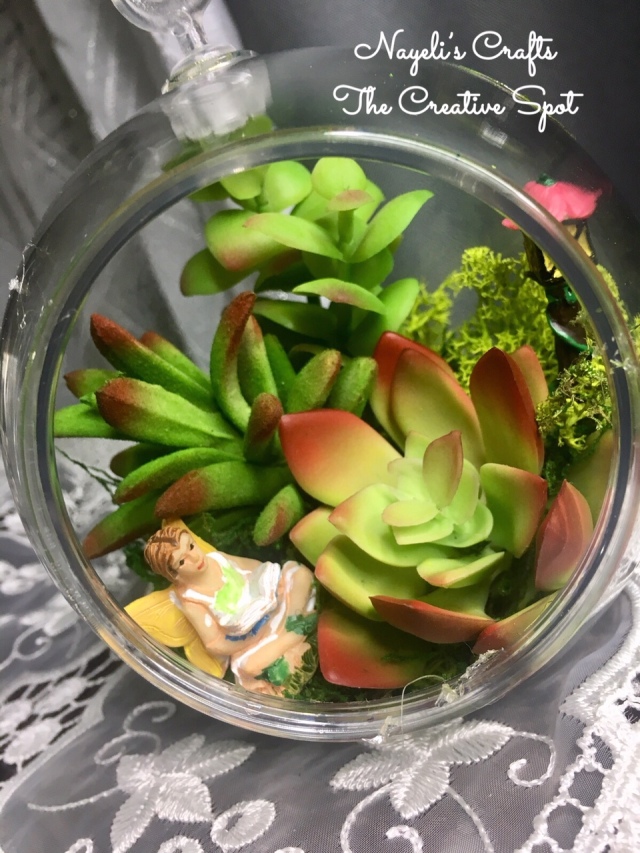
Hello everyone! I have another little fairy garden to show you.  This time I used a terrarium from The Dollar Tree. All the items used are dollar items or below. Very affordable! It is a very easy and simple fairy garden. Use whatever plants you want to use. I used succulents. In the picture above you see two succulents in the back that I bought at Hobby Lobby for about 50 cents. They were on sale when I bought them. The flower succulent I bought at Dollar tree. The fairy you see I also bought at Dollar tree as well as the moss. I thought I would share with you all now I made this little terrarium.

For this project you will need:

  • Fake Succulents
  • Terrarium
  • Moss
  • Fairy Figurine
  • Piece of styrofoam
  • Hot glue gun

First you are going to start with the Styrofoam. You can buy it at any craft store. I bought mine from Dollar Tree and cut a little rectangular piece. Then I hot glued moss all around it to cover up the styrofoam. Then I inserted the two of the long plants into the styrofoam.

IMG_0362

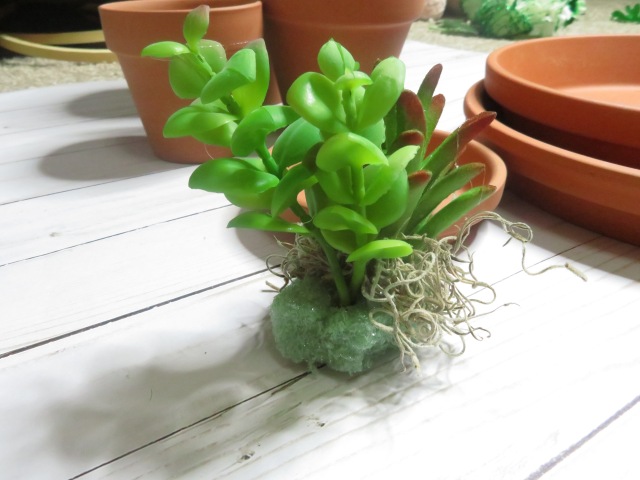
These two plants I bought at Hobby Lobby. They were in the wedding section.

IMG_0363

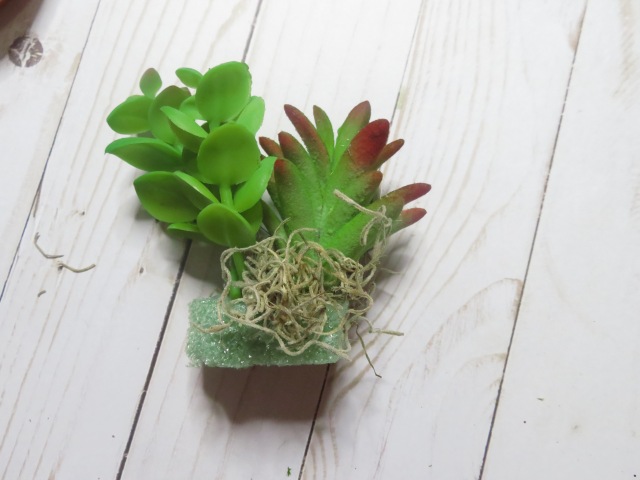
I also used Spanish Moss from the Dollar Tree.

IMG_0365.JPG Don’t put any moss at the bottom of the styrofoam since you will be putting hot glue. I put hot glue all around the bottom and placed it inside the terrarium. Place it towards the back and hold it for a few seconds because it will try to fall forward due to the weight of the plants. Once it has glued on to the terrarium, you will add some more moss. I added some Reindeer Moss. I used my 40% off coupon at Michaels. You can find it at Walmart for about the same price with the 40% off coupon. It’s about $4. You can also use the Dollar tree moss as well but I thought the reindeer moss looked great. I love bright color.

IMG_0366.JPG

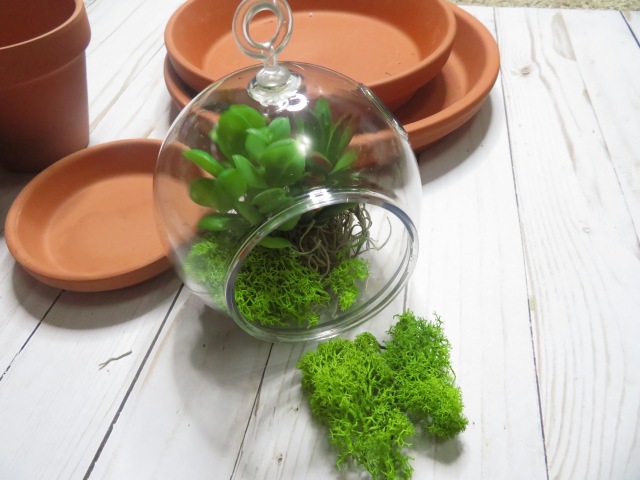
Add a  little hot glue at the bottom of the reindeer moss and glue it into the bottom of the terrarium.

IMG_0368

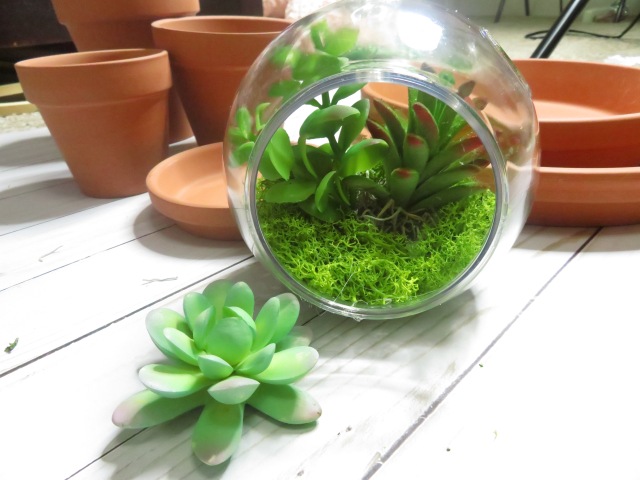
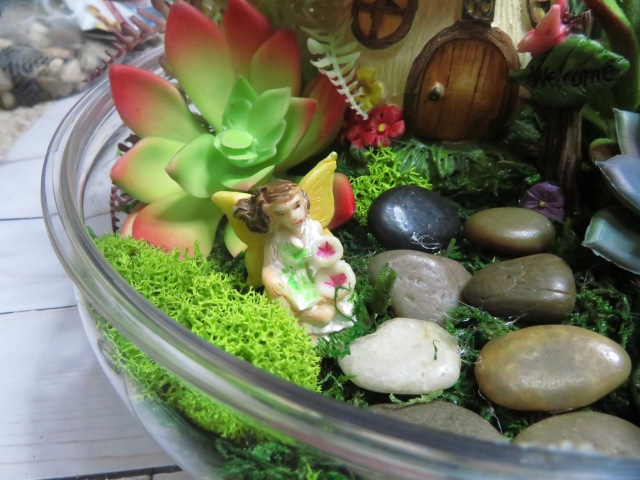
Now you will hot glue the  flower succulent in front of the plants already inside.

IMG_0369

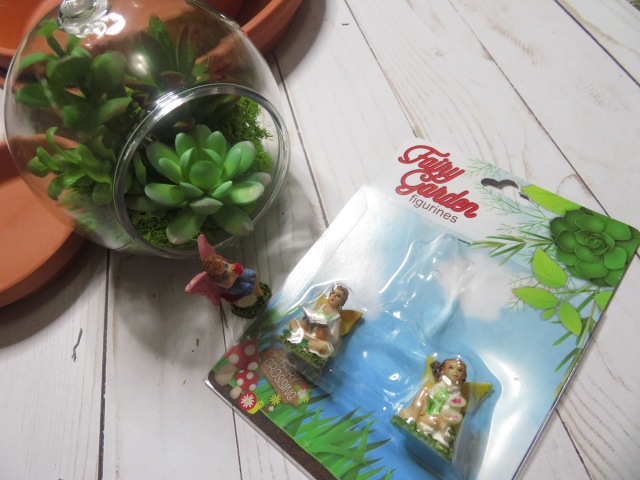
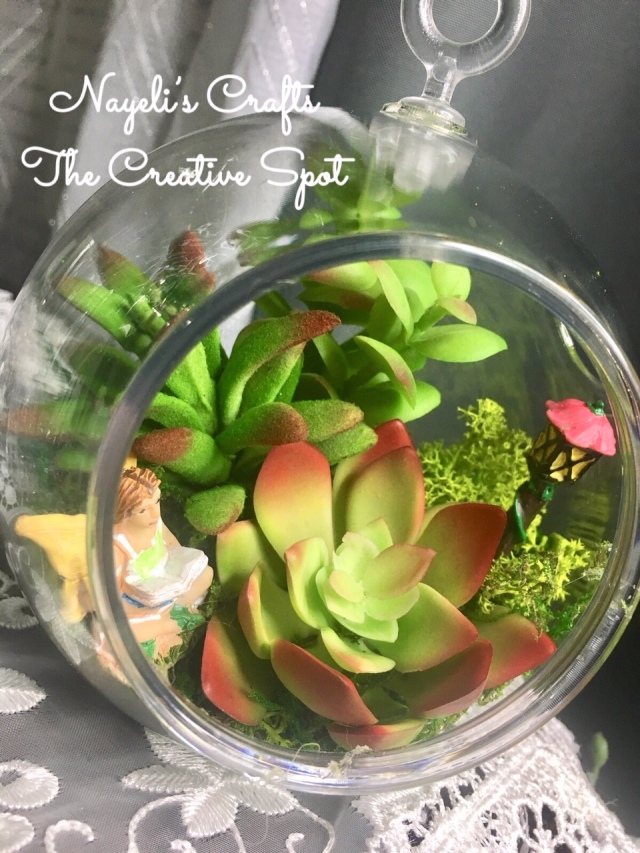
The last thing to do is add a little miniature fairy. I got a pack of fairies from the Dollar Tree. Hot glue her inside the terrarium wherever you’d like. Your project is now done! As mentioned earlier, it is a very simple and easy fairy garden DIY.  Here is another one I made. I added another little fairy and a little light post.

IMG_9480

IMG_1959

That is all for today! I  think this will be my last fairy garden post. Time to move on to other crafts. Have a great day!

Nayeli

Dollar Fairy Garden

IMG_1523


Hello again! On today’s post I have another fairy garden that I made. I just love making these things! I think they’re cute. I went to a plant nursery yesterday and they were doing a fairy garden making event. I saw two little girls making their own fairy gardens using real plants. It was Easter themed. They added some cute fairies, bunnies, and mushrooms. They did a pretty good job! I really wish I would have made one too but my husband and I were looking for plants for our garden. I found a few succulents to make some fairy gardens of my own using real plants. I am new at this so I don’t know how to mix different plants together. The little girls had different plants and succulents and their fairy gardens looked beautiful. This fairy garden I made here has all fake succulents. I wanted to show everyone that you can make your own fairy garden using dollar items. Also, if you are someone who can’t make plants live long this is a great way to use as decor around your home. Your plants will last a long time and they wont die! 😉

Everything is mostly from Dollar Tree except for the three plants in the back of the mushroom house. The  plant on the left is from Michaels and the other two from Hobby Lobby. With sales and coupons they cost me about a dollar each. It is all pretty affordable.

IMG_1521

To make this fairy garden, here is what you will need

-Clear Garden dish

-Mushroom house

-Packs of fairy figurines from Dollar Tree

-Bag of rocks

-Succulents from Dollar tree or any craft store

– Moss of your choice

-Flat circular Styrofoam (optional)

-Hot glue gun

IMG_0392.JPG

IMG_0376

For the moss, Dollar tree has some  different types of moss you can use. I added a little Reindeer moss I had left over from my succulent clay pot fountain.

I started off by hot gluing the circular Styrofoam in the center of the garden dish. The reason I did this is so that moss won’t move around so much and to make the fairy garden look higher. I also used it so I can punch the stems of the succulents through the Styrofoam so they will be more secure.

Now hot glue some  moss around the Styrofoam  and fill up the sides. You don’t have to hot glue the moss on the sides or anything. Only the Styrofoam so that you cover up the white part. It is time to assemble the fairy garden. I started of placing the bushy plants at the back of the garden dish, punching through the Styrofoam. Then I hot glued the mushroom house in front of those plants. Start putting you the succulents on the sides. Make sure you punch them through the Styrofoam so they wont move. I then hot glued some rocks in front of the mushroom house making a little trail. Last, hot glue some fairy figurines into your fairy garden. Dollar tree always carries a bunch of mini fairy garden figurines each year. I bought all of the different packs they had.

The fairies aren’t as pretty and detailed as ones you find at Michaels but it still looks pretty!

IMG_0401.JPG

Here  I just love the little green welcome sigh. The mini mushrooms are also cute!

IMG_0402.jpg

You can put anything you want on your fairy garden. Use your imagination. No matter what you decide to put on your fairy garden it will come out beautiful! Your fairy garden is complete! You can put it anywhere in your home or even outside your door or garden. Just make sure you put it inside if it rains. The little fairies will drown and so will their home! Haha. Hope everyone has a wonderful day! Bye!


Nayeli

Shamrock Flower Fairy Doll

Top o the mornin! I’m feeling lucky today. How about you? I got inspired to make a Shamrock flower fairy the other day. I  have done Fall fairies, Halloween Fairies, Christmas Fairies, 4th of July fairies, and even unicorn fairies. I have never done a St. Patrick’s Day fairy. Since we are now in the month  of March, I decided to finally make one. I found some leaf clover buttons at Hobby Lobby and knew I wanted to make a little shamrock flower fairy.  I had an idea on how to make her but I wasn’t sure if it was going to work out.  Well, she turned out just like I had imagined! Here she is.

IMG_1328

I thought I was going to have trouble making the hat but I didn’t. Love how the hat turned out. The only thing I would do is change the type of felt I used. The felt was a little too thin and soft. I will have to go back to Hobby Lobby and buy the thicker felt. I think it makes the hat look better. It would have better structure. The shamrock buttons are the ones you see on her hat and dress.  I always like to buy those buttons every holiday to decorate my fairies. My friend liked her so much she wanted me to make one for her. She wanted me to make her a blonde one. Here is how she looks.

IMG_1355

Blondie wanted to hang out in my succulents tray in the kitchen and pose for the camera. Haha. I may have to make another one! That is all for this post. May your blessings outnumber the shamrocks that grow, and may trouble avoid you wherever you go. For each petal on a shamrock brings  you good luck, health, happiness, and love! For today and everyday!

Nayeli

Pastel Unicorn Fairy/Hurricane Harvey

Hello everyone! I finally got some time off to post on here. Sucks I  am close to Hurricane Harvey AND I had all my 4 wisdom teeth pulled out today. I asked for a week off from work so I will be posting a few blogs.  I wanted to show you all my pastel unicorn fairy. I love unicorns and fairies! Why not combine them and make a fairy unicorn! Haha. Here is what she looks like.

IMG_8754edited


She has unicorn pastel hair with baby blue, baby pink, and purple hues. The side of her hair is adorned with iridescent jewels, bears, and white and lavender flowers. On her forehead she has a golden glittery unicorn hair.

IMG_8757edited


The top of her dress is an iridescent lavender color and her rose floral dress is adorned with jewels, pearls, and ribbon.  Her dress also is glittered at the edge of each petal. Her wings are an iridescent white and change color depending on the light.  Her shoes also have that lavender color of her top dress with a pearl in the center.

IMG_8722

The back of her wings has a small white floral and a pearled ribbon hanging from the back of her waist.  I really love how she turned out. I loved how she turned out so much that I made more.  I  hope you enjoyed looking at my fairy and hope you have a wonderful day. I will post my Mint fairy tomorrow! If you are in Corpus or anywhere near hurricane Harvey please stay safe. Take care!

IMG_8766edited

Nayeli  The Crafty Girl


Handmade July Fairy #3

Hello! So today is my last post on my July fairies. For some reason, this inspired me to make a Wonder Woman fairy. Must be the colors. She looks like the first July fairy I posted about but there are some differences.

IMG_8523edited

The flowers dress is different and I only used red and blue flowers on this fairy. She has the same star crown as the other fairy. IMG_8536edited

Wings are blue on this fairy and her top is silver. That is pretty much the differences.  I am thinking of putting faces on my fairies. I think its time I start adding some cute eyes with lashes and tiny lips. Kind of like the ones I draw on my pine cone angels.  Well that is all for today. Just wanted to show my last July fairy to everyone.

Nayeli The Crafty Girl

Floral Wreath

Hello everyone! Today I am posting about a floral wreath that I have been meaning to post but completely forgot about it. This wreath was made back in the Spring. I currently have it displayed inside my house hanging from a wall mirror. It originally started off with just plain white flowers. It was displayed like that for a while until I decided to add some more to it. Here is what it looks like now.

IMG_4922edited

I somehow didn’t match the flowers very well. Some look whiter than the others. I bought flowers from different stores like Michaels, Dollar Tree, and Walmart. They never had enough flowers so that is why I bought from different stores. What  I added to the wreath was the burlap lace bow and some tiny white flowers with greenery. I also added some crystals I found at Hobby Lobby.

IMG_9172


I think adding all these new things made the wreath look so much better. It looked nice with just plain white flowers only but those that know me know I like to be extra and be different. I am pretty pleased with how it turned out.  Just thought I would share this with you all. Even though not many ready my posts anymore since I have been MIA for so long. lol I am working on coming back though. I am really trying hard to post more often. I got a lot more new things that I have made and will be posting about them as the months go by. Thanks to those who do read my blog. I really appreciate it. Have a great day or night.  Whatever it may be enjoy your day and stay positive. Byeeee!

Nayeli The Crafty Girl

Shabby Chic Heart Frame

Hello everyone! Hope everyone had a wonderful week. It is Thursday and after a long stressful day of work, I am glad I have another  3 day weekend. I apologize for not posting this when I said I would. Today I am posting this cute shabby chic frame I made in February. It was initially intended for Valentines but you can use this year round. Like the heart shaped wreath I made, it has  neutral colors that don’t scream Valentines. At least in my opinion it doesn’t. Haha.

img_7510

Making this frame was a pain  in the butt! I was originally going to make it look very Valentines by putting the words “LOVE” in gold glittery letters. The “O” was going to be a red heart. Well, the letters I had did not fit in the frame with the heart. I then decided to just put a red heart in the middle with the words “LOVE” in the center of the heart. It looked cute but it just didn’t go with the dark wooden frame. Eventually  I ended up with this little burlap heart and the word love in the center.

No  matter what I did with this frame, it just didn’t turn out the way I wanted it to look. I bought the frame at the 99 cents store. I stained the wood with a Walnut color. In the picture of the can it looked lighter and was hoping it would look like the picture. Nope, it was darker. >:/ I really wanted that light brownish color that didn’t look so harsh. There was nothing I could do so I went  on to add the lace on the frame. My mother in law had given me so much ribbon and lace for me to use in  crafts.Came across this beautiful lace. I just love this lace and thought it would go great on this frame. I had the bright idea of stapling the lace to the back of the frame. I wanted the lace to be tight and not lose. Well, the staples broke through the front of the frame. It did not look too bad but being the perfectionist that I am, I couldn’t let it go. I had to figure out how to cover that mess up. That’s when I found this lacy ribbon with pearls and hot glue it around the frame.

img_7754

As mentioned earlier, I had originally glued a red heart in the center. I did not  like how it looked so I used burlap instead. That is when I decided this frame was going to be more of a shabby chic style. I hot glued my burlap heart in the center and hot glued the glittery letters as well in the center of the heart. I then, hot glued some gold  ribbon around the heart to make it look more 3D. I was going to leave  the frame like that but it was missing something.  That is when I remembered I had some pretty white lace and white fabric flowers I bought at Michaels. I hot glued 3 of them on the upper left hand side of the frame. Oh but that simply wasn’t enough. You know I had to add more bling to it. I glued some heart shaped rhinestones on each corner of the frame on the lace. Tada! That is my final product!

I really love how it turned out even though I had to redo it so many times. I still wish the staining of the wood would have been lighter. I have it displayed on the table I have near the front door.

img_7756

Hope you enjoyed this post! Until next time.

Nayeli The Crafty Girl

Sweet heart Fairy

Hello again! So today I have another fairy to show you. I didn’t know what to call her so I went with sweet heart since she has 3 pink hearts on her dress.  Shes a very whimsical fairy with iridescent  colors. She wings and dress glisten as she flies through the magical forest. If you see something sparkling from the corner of your eye, that is probably her flying around. 😉 I really wish I could have taken  a picture of her with some pretty greenery outside but right now everything is dried out and brown after the freeze we had in December. All my plants are gone and the grass is brown and nasty. I can’t wait until spring when all the pretty plants and grass turn green again!

16388296_10208557288269097_2229352972980880453_n

I  recently went to Walmart and saw this beautiful iridescent fabric that reminded me of fairies. When I go to to the Texas Ren Festival I  always see  a lot of girls wearing fairy wings in this color. I thought it would be perfect for my fairies. I  also found a pretty pink and blue fabric like this one and bought it. I was trying to make mermaids earlier today with this fabric but it hasn’t been working out.  It takes a few tries for me to get it right. Anyways, I wanted to make wings like the ones I see  at the Texas Ren Fair for my fairy. I drew out the wings on paper and cut it to use as a stencil. Then, I cut out some white felt and the iridescent fabric with that stencil. I cut out two wings with the iridescent fabric and glued them to both the front and back of the white felt. I was going to add some wire to create some intricate design on the wings but decided to just add some rhinestones.  I also added pieces of the fabric to her dress to give it more  dimension.

img_7449-1

I  don’t know if I did right in adding those pink hearts. Since I am still on the Valentines theme I added them. I also tried curling the dolls hair. It looked so pretty when I first made it but the next day the curls were  falling down. I have to figure out a way to make them stay longer. Maybe hairspray? So that is my fairy for the day. I am working on a unicorn and mermaid doll right now. I am starting to feel sick though so I am going to call it quits for the night. I have a cold and have been feeling very yucky. Just wanted to share this cute whimsical fairy I made. Have a great day!

Nayeli The Crafter

Sweet Valentine Fairy

Hello  everyone! It’s been a while since I have posted.  I am back  now that the Christmas holiday is over and all family finished visiting my husband and I. It was the most we have had people visiting. Now that all that is done with, it is back to crafting for  me. Valentines  is just around the  corner and I have  been trying to  make several  Valentine fairies as well as other crafts. Today I have a sweet Valentines fairy doll to show you. She is all pink and sparkly with a cute heart  fairy wand.

img_7366

She also loves to have tea time parties with her fairy friends.  Her favorite tea cups are ones with pink flowers just like her dress.

img_7365

Oh and she loves coffee too. Shes a coffee addict like myself. Not good. Hahaha. I decided to try something different with my current fairies. My fairies now have little shoes. Not really shoes but you know  what I  mean. Adding little shoes was a bit tricky. I had to make sure they looked almost the same and that they evened out otherwise she would not  be able to stand up straight. It happened with this fairy. I made one thicker than the other so it looked like she had one leg longer  than the other.  I kind of fixed it but its still not completely even. With the next fairy I am going to post about, I was able to get it just right.

img_7368

Even though I added some little shoes with the floss, it is hard to get them to stand up alone. My next step is to make some little wooden stands for them. I also want to add little faces to them. What do you think I should do? I really like how they look with the little shoes. I added some little pearls to make them look even cuter.  So that is one of my valentines fairy dolls. I can’t wait to show you the other ones!

img_7367

I will also be making some Easter fairies, St. Patricks fairies, and mermaids! I am so excited to start working on the mermaid ones! Hope everyone has a great day.  Until next time.

Nayeli The Crafty Girl


Christmas Pine Cone Angel

Hello everyone I am back! I know I just posted but I just want to get this out of the way. I want to concentrate tomorrow on making my elf dolls so I can have that post up by Wednesday. I also made this pine cone angel over the weekend. I don’t have a tutorial on this yet but I will be making more pine cone angels later this month. These are a bit complicated to make so explaining how to make this may be a bit difficult for me. For now I thought I would share this cute Christmas pine cone angel. You might be thinking, this looks familiar. That is because I already have a post about this from way back. I don’t remember if there is a tutorial on it or if I explained how to do it. That’s how long it has been.

img_6488

I had fun making her. I used the traditional Christmas colors for her wings. I had this plaid ribbon laying around from last year. I also used it for my snowman scarf. I love plaid and knew I needed to use this ribbon already in my crafts. The hardest part for me when making these angels is the hair. I used dried moss from the dollar tree. Lets just say I burned my fingers a lot with the hot glue. Making these pine cone angels is cheap. If you live in an area where there are a lot of pine trees this would be pretty cheap to make. Free pine cones! Ribbon was bought when it was on sale and the wooden ball for the head is a little over a dollar. The wooden heart too and if you use your 40% coupons at Michales or Hobby lobby it will be even cheaper.

img_6489

Well, that is all for today.Just though I would share my new creation.  I am falling asleep! Expect a future post on this with a tutorial soon! Goodnight everyone!

Nayeli The Crafty Girl